
The Single Sign-On (SSO) feature of Barco Management Suite (BMS) allows Account administrators to configure and enable/disable single sign-on for one of the claimed domains (e.g. example.com) of the Account.
We support the following SSO protocols:
- OpenID Connect v1.0 (OIDC)
- SAML v2.0
To become an Account administrator, you will need to either verify your access on your email domain or request access from an existing administrator (how to: see KB 10353).
When you don't know the administrator of your Account, please create a support ticket to find this out, see KB 6024 for details.
Content
- First time Single Sign-on configuration
- Migrate Users
- Update configuration
- Deactivate configuration
- Remove configuration
- FAQ's
A. First-time configuration
First-time configuration depends on the SSO protocols used. Use the links below to jump to the respective section.
A.1 First time configuration with OpenID Connect v1.0 (OIDC)
We assume that you have an existing application on your IDP.
To complete the OpenID Connect configuration, you'll need to follow the next 5 steps.
- Start the Single sign-on configuration for the domain in BMS.
- Configure the application on your IDP.
- Complete the Single sign-on configuration in BMS using your IDP Application Secret and Client ID.
- Activate the Single sign-on settings in BMS.
- Migrate the users through BMS.
These steps are explained in more detail below.
A.1.1. Start the Single sign-on configuration
- Navigate to the Single sign-on settings page on Barco Management Suite.
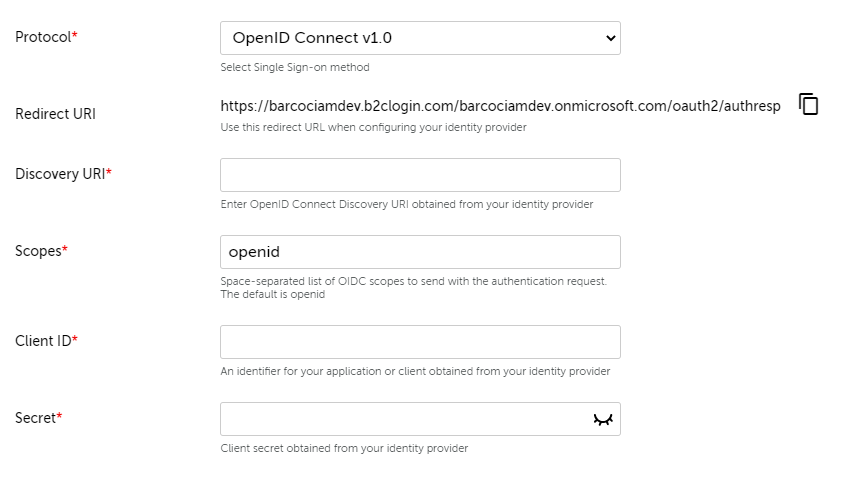
- Select protocol as OpenID Connect v1.0
- Copy and save the Redirect URI.

A.1.2. Configure the application
In this step, we configure the application in your IDP to allow your users access to Barco Single sign-on.
- Use the Redirect URI from BMS in your IDP Application.
- Create and save the Application Secret on your IDP and Application Client ID.
Example: read [KB 1865] for an example of how to configure this in the Azure portal.
A.1.3. Complete the Single sign-on configuration
- For Discovery URI enter the OpenID configuration endpoint defined by your IDP.
- Optionally, add your scopes to the Scope field, without removing 'openid'.
- Add the Client ID and Secret from your IDP application.
- Optionally, change the Claims when you've specified your own.
- Save this configuration by clicking on Save.
 |  |
A.1.4. Activate the Single sign-on settings
After you've completed the previous step, the Status for your domain shows as ‘Configured’ with the Protocol as ‘OpenID Connect v1.0’.

To activate Single sign-on for the domain, click on the Enable Single sign-on menu option.
A confirmation dialog will pop up and then you may click on Enable after reading the impact of this action in the dialog description.

The Status for your domain is now ‘Single Sign-on enabled’.

A.1.5. Migrate the users
See migrate users .
A.2 First-time configuration with SAML v2.0
We assume that you have an existing application on your IDP.
To complete the SAML configuration, you'll need to follow the next 6 steps.
- Start configuring the application on your IDP
- Start the Single Sign-on configuration on BMS
- Complete configuration on your IDP
- Complete configuration on BMS
- Activate the Single Sign-on settings
- Migrate the users
These steps are explained in more detail below.
A.2.1 Start configuring the application on your IDP
In this step, we configure the application on your IDP for SAML-based Single Sign-on.
- Select the Single Sign-on mode as SAML
- Get the federation metadata file for this application
Examples:
- Read [KB 1865] for an example on how to configure this in the Azure portal
- Read [KB 7268] for an example on how to configure this with ADFS.
- Read [KB 1869] for an example on how to configure this with okta.com.
A.2.2 Start the Single Sign-on configuration on BMS
- Navigate to the Single Sign-on settings page on Barco Management Suite
- Select protocol as SAML v2.0
- For Your metadata, select the federation metadata file obtained from your IDP & click Upload.
- After the metadata has been uploaded, download the Barco metadata file by clicking the download button.

Note: If the Barco metadata doesn’t start downloading, you may need to check your browser settings.
A.2.3 Complete configuration on your IDP
In this step, you need to use the Barco metadata file obtained from BMS to complete configuring the application on your IDP.
A.2.4 Complete configuration on BMS
After the configuration in IDP is completed, we will complete the configuration on BMS.
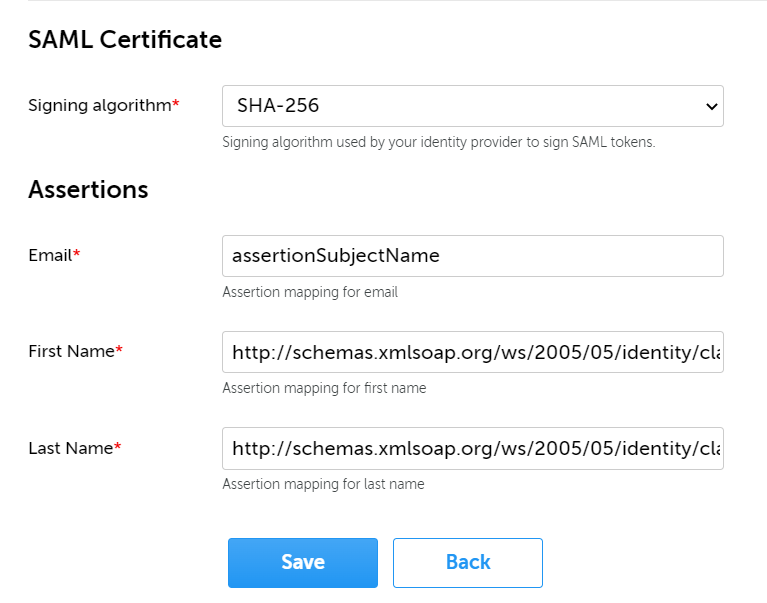
- Set the Signing algorithm under SAML certificate, according to the configuration on your IDP.
- Optionally, change the Assertions for Email, First name or Last name.
- Save this configuration by clicking on Save.
A.2.5 Activate Single Sign-on settings
After you've completed the previous step, the Status for your domain now shows as ‘Configured’ with the Protocol as ‘SAML v2.0’
To activate Single sign-on for the domain, click on the Enable Single sign-on menu option.
A confirmation dialog will pop up and then you may click on Enable after reading the impact of this action in the dialog description.

A.2.6 Migrate the users
See migrate users.
B. Migrate Users
When you have successfully activated Single sign-on for your domain, you can migrate users from a Barco login to a single sign-on-based login.
-
Navigate to User Management → Internal users page.
-
For the users with ID Type as 'Barco ID', click on options → Switch to Single sign-on ID.
C. Update configuration
- General Instructions
- Update Secret for OpenID Connect
- Change Single Sign-on protocol
- Update SAML v2.0 Metadata
C.1 General Instructions
To update the Single sign-on configuration on your domain, follow these next 4 steps:
- Navigate to the Single Sign-on settings page on Barco Management Suite
- From the options menu for the domain, click on Edit Single sign-on settings.
- Wait for some time until the page is loading, then edit the settings you want to update.
- Click Save.
C.2 Update Secret for OpenID Connect
To update the Secret for your OpenID Connect configuration, follow these next 4 steps:
- After following General instruction steps 1 - 3, scroll to Secret.
- Click on the Edit button.
- Add the updated value.
- Click on the Save (
 ) button.


C.3 Change Single Sign-on protocol
BMS allows to change the Single Sign-on Protocol, even if the domain is 'Configured' or 'Single sign-on enabled'. However, changing the protocol removes the current configuration which may impact single sign-on users.
To change the Single Sign-on protocol for the domain, you'll need to follow these steps:
- Navigate to the Single Sign-on settings page on Barco Management Suite
- From the options menu for the domain, click on Edit Single sign-on settings.
- Wait for the page to load, then select the Protocol menu and choose the single sign-on method you want to use.
- If single sign-on is enabled for your domain, a confirmation dialog will pop up. Click on Yes, if you understand the impact.
- Follow the instructions for First-time configuration for the selected protocol.

C.4 Update SAML v2.0 Metadata
To update the SAML Metadata file for Single sign-on configuration, follow these steps:
- Follow general instructions (steps 1-3).
- Click the folder icon to open File Explorer and select the new metadata file that you want to use.
- After selection, a warning appears on updating metadata. Click Upload.
- Metadata file has been updated successfully.


D. Deactivate configuration
Deactivating configuration for a domain does not remove its Single sign-on settings.
- To deactivate the Single Sign-on configuration for a domain, navigate to the Single Sign-on page on BMS.
- Click on Disable Single sign-on menu option.
- A confirmation dialog will pop up and then you may click on Disable after reading the impact of this action.
- This sets the Status of the domain to 'Configured'.
E. Remove configuration
Removing configuration for a domain also deactivates Single sign-on for the domain users. To use Single sign-on after the configuration has been removed, go through the steps for First-time configuration to set it up again.
- To remove the Single Sign-on configuration for a domain, navigate to the Single Sign-on page on BMS.
- Click on Delete Single sign-on settings menu option.
- A confirmation dialog will pop up and then you may click on Delete after reading the impact of this action.
- Single sign-on for this domain is deactivated and the configuration is removed. The Status for the domain is 'Not configured'.


