
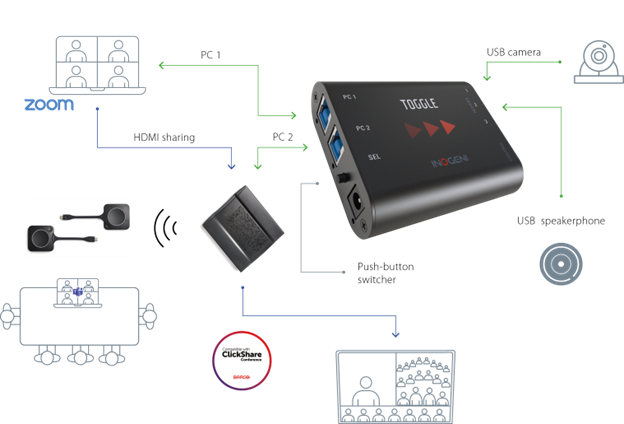
To use ClickShare Conference CX-50 in combination with a laptop, the INOGENI Toggle can be used to automatically switch the USB peripherals between the two systems. The laptop can share his screen via the HDMI™ input on the CX-50.
ClickShare Conference CX-50 can be used with wired connection with a laptop. With this setup, it is easy to switch between ClickShare CX-50 Conference collaboration and BYOD laptop. Then, the automatic switching feature can then be used to jump to the BYOD laptop to use other UC clients like Teams, Zoom and Google Meet using room display.
To set up this configuration
- Connect CX-50 USB to Toggle USB-B.
- Connect BYOD PC USB to Toggle USB-B. Make sure that the Toggle is configured to automatically switch the peripherals to this port once this USB connection becomes active. In all other cases the peripherals are switched to the port where CX-50 is connected.
- Connect CX-50 HDMI Out to display. Connect the BYOD HDMI Out to HDMI In of CX-50.
- Connect USB Peripherals (either all-in-one audio-video USB system, or USB camera and USB speakerphone) to Toggle USB-A.
- Optionally, for control, connect the Toggle GPI/RS232 to the corresponding control system.
Once all the connections are made and the configuration is done, the user can walk in the room and
- Wirelessly present by connecting to ClickShare with either the Button or the ClickShare App and start presenting via ClickShare, the user can share his screen or individual applications.
- Wirelessly conference by connecting to ClickShare. By default, the USB peripherals are switched to ClickShare so that no user action is required. The user can start any UC client, show his content, etc. By using Smart Meeting flows, the user is able to show people and content next to each other, and the meeting flow is largely automated (see video ClickShare Conference – Introducing smart meeting flows).
- Connect his laptop to the Toggle USB-B: the peripherals will automatically be switched from ClickShare to the laptop. Using the HDMI input of the ClickShare, the user can share his laptop HDMI output to the display. The user can run any UC client on his laptop using the native peripherals and share his laptop screen in full HD resolution. This can be a useful addition to rooms where certain users cannot use the ClickShare Button or App.
INOGENI Toggle configuration application
Here is the INOGENI Toggle configuration available using the INOGENI Control App.
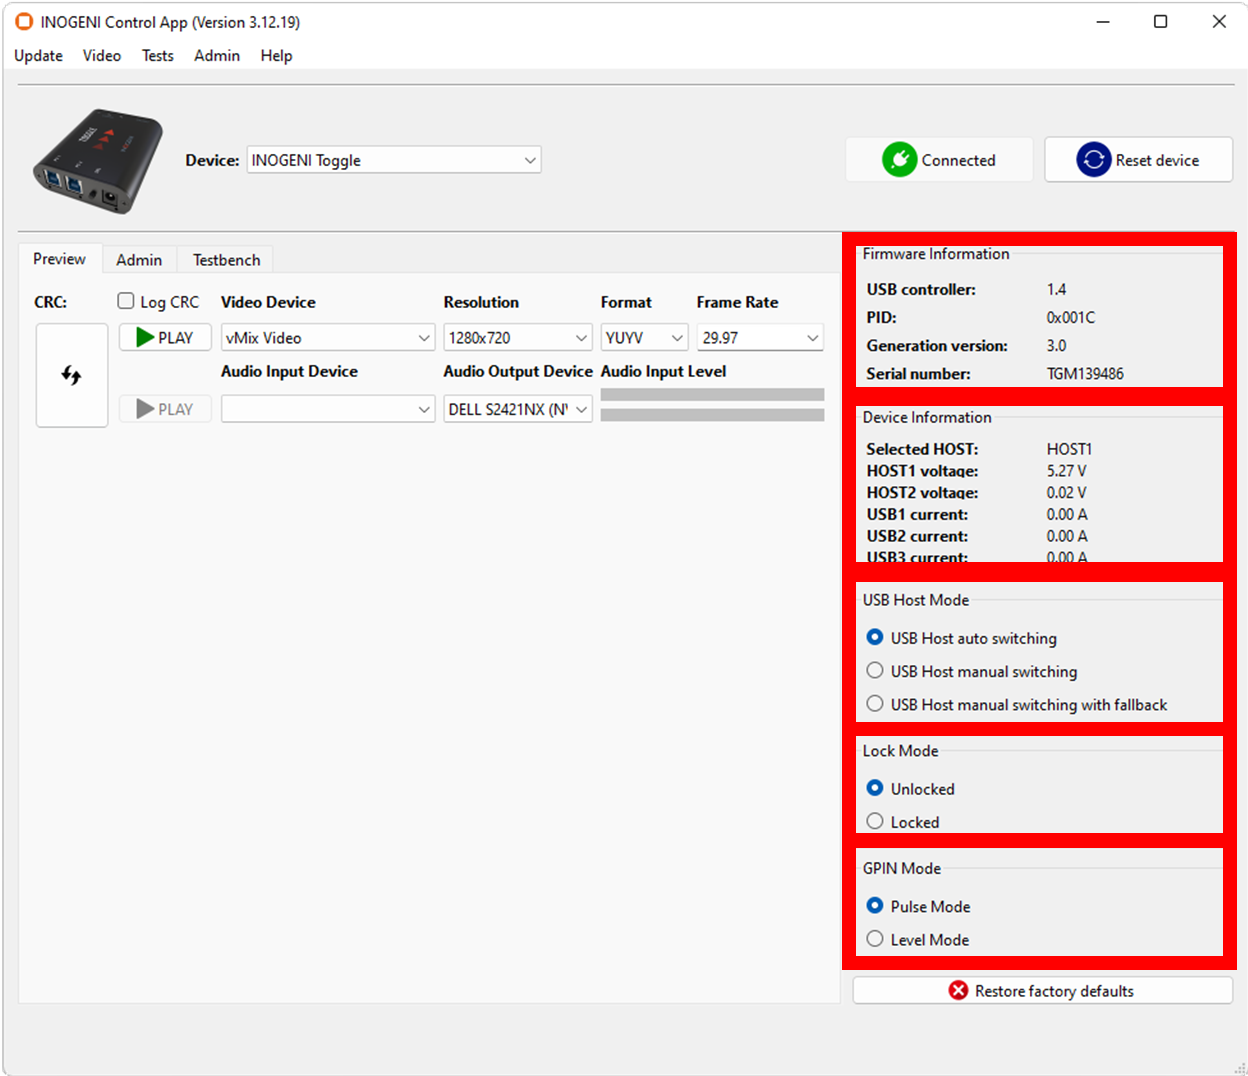
In this section you can see installed firmware information
Device information:
This section shows the currently selected PC.
You can also monitor VBUS voltages and USB current consumption on each USB devices ports.
USB Host Mode:
USB Host auto switching:
This is the default mode. This mode will connect to the last detected PC connection.
USB Host manual switching:
This mode will enable user to manually set the PC connection through RS232 or GPI.
USB Host manual switching with fallback:
This mode looks like the manual mode. However, this mode will allow device to switch to the other PC connection if the current one is lost.
Lock mode:
This mode allows you to lock the action of the button on the device to avoid any disturbance.
GPIN mode:
Pulse mode:
This is the default mode. A pulse on this pin will initiate a PC switch
Level mode:
A level 0 will initiate a switch to PC2.
A level 1 will initiate a switch to PC1.
Tip!
If you need to use USB extenders, we suggest you use a tested one available on the INOGENI website.
https://inogeni.com/support/compatible-usb-extenders/
Here are tested USB extenders with Toggle and ClickShare devices.
- Icron USB 2.0 Ranger 2304
- Icron USB 3-2-1 Raven 3104 Pro
For more information, please contact support@inogeni.com

